A couple of times over the last year when I was thinking of new items to add, he has suggested head covers for golf clubs. I don't golf myself so I hadn't realized, but I guess the "woods" (now made of metal, but originally made from wood) are covered with a decorative enamel on the non-hitting surfaces that can easily get scratched when the clubs bump into each other, and the larger driver has the same issue. So most golfers have a set of head covers, usually made from some type of cloth, to protect the woods and the driver. The head covers for the woods always have numbers on them so the golfer can tell which club is which without taking off each cover. The other clubs, the "irons" don't have this enamel so they usually don't require covers.
When my Dad's birthday came around this year (in mid-May) and I asked what he would like for his birthday, he reminded me about the head cover idea. I got his colour requests (royal blue with a silver stripe to match his golf bag which is navy and silver, with a royal blue towel), and my Mum took some measurements of his clubs for me (they live in Calgary, which is an 8 hour drive away), and I got started.
I scoured the net for any free patterns that I could use to get a general idea of the construction of a golf club head cover. I knew it would need a narrow neck part, and a larger head part, but the neck would need to either open up or be stretchy enough to allow the club head to fit through. I was surprised at the lack of patterns out there (there probably would have been more knitting patterns of course) - all I could find was this lion brand one-size-fits-all pattern. It looked ok, but since it was the same for the driver and the woods, it was a huge bulbous thing that would be tight on the driver but incredibly floppy on the others.
I made one according to that pattern (but using my colours and making the stripe vertical instead of horizontal), just to see how it would turn out, and then went in search of a set of golf clubs to try it on. The ribbed effect for the neck worked well to give the required flexibility to get the club in, and then retracted to hang nicely around the shaft of the club. As I suspected though, the head was large enough for the driver but way oversized on the woods. It was also symmetrical, which worked fine for the almost spherical driver, but I figured that an asymmetrical cover made with a smaller hook would fit the woods much more neatly.
Here is the first one:
I then spent an afternoon at my stitch group trying to re-work the pattern for the woods, and after a few attempts I was quite pleased with it, and started to make another. Partway through the second one I decided to try a narrower stripe (2 rows instead of 3 in the cuff, and 2 stitches instead of 3 in the head) - and was much happier with the look.
Here is the first one with the wide stripe:
During a video call with my parents I showed my dad the prototypes and he agreed that the thinner stripe was more of what he wanted, so I stuck with that for the next two covers. This of course meant that I had to re-do both the first of the smaller covers, and the original cover for the driver, so that they would all match. I took this opportunity to adjust the driver pattern some more to be wider and less tall, to fit the shape of the driver more closely.
Here are the finished covers before adding the numbers:
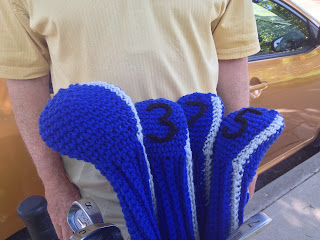
Finally I made the black chains and stitched them on for the numbers. I considered making a "D" for the driver cover but finally decided against it since the driver is so much obviously larger.
Here is the picture of the finished set that I texted to my dad to let him know they were done:
My parents came for a visit a few days later, and here are the covers on the clubs:
I have just finished writing up a polished version of my finalized pattern, and it's now available on my Etsy store: https://www.etsy.com/ca/listing/156239426/mitch-golf-club-cover-pattern-to-crochet?ref=shop_home_feat
Like the pattern but don't have time to make them? The custom covers are also available on my Etsy store:
https://www.etsy.com/ca/listing/156335134/custom-mitch-golf-club-cover-made-to?ref=shop_home_active


No comments:
Post a Comment