Monday, 15 July 2013

A Dad-Inspired Project

Over the past year as I have started up this blog and then my Etsy shop my Dad has been a huge supporter. He's my proofreader for this blog (he makes sure that no typos or autocorrect goofs make it onto the published post!), and is always arguing for me to set my prices to value my time as well as the material costs. In short, he's all a girl could ask for in a supportive Dad! [Awww] <--- That's a comment from him when he proofread this post, hehe!

A couple of times over the last year when I was thinking of new items to add, he has suggested head covers for golf clubs. I don't golf myself so I hadn't realized, but I guess the "woods" (now made of metal, but originally made from wood) are covered with a decorative enamel on the non-hitting surfaces that can easily get scratched when the clubs bump into each other, and the larger driver has the same issue. So most golfers have a set of head covers, usually made from some type of cloth, to protect the woods and the driver. The head covers for the woods always have numbers on them so the golfer can tell which club is which without taking off each cover. The other clubs, the "irons" don't have this enamel so they usually don't require covers.

When my Dad's birthday came around this year (in mid-May) and I asked what he would like for his birthday, he reminded me about the head cover idea. I got his colour requests (royal blue with a silver stripe to match his golf bag which is navy and silver, with a royal blue towel), and my Mum took some measurements of his clubs for me (they live in Calgary, which is an 8 hour drive away), and I got started.

I scoured the net for any free patterns that I could use to get a general idea of the construction of a golf club head cover. I knew it would need a narrow neck part, and a larger head part, but the neck would need to either open up or be stretchy enough to allow the club head to fit through. I was surprised at the lack of patterns out there (there probably would have been more knitting patterns of course) - all I could find was this lion brand one-size-fits-all pattern. It looked ok, but since it was the same for the driver and the woods, it was a huge bulbous thing that would be tight on the driver but incredibly floppy on the others.

I made one according to that pattern (but using my colours and making the stripe vertical instead of horizontal), just to see how it would turn out, and then went in search of a set of golf clubs to try it on. The ribbed effect for the neck worked well to give the required flexibility to get the club in, and then retracted to hang nicely around the shaft of the club. As I suspected though, the head was large enough for the driver but way oversized on the woods. It was also symmetrical, which worked fine for the almost spherical driver, but I figured that an asymmetrical cover made with a smaller hook would fit the woods much more neatly.

Here is the first one:


I then spent an afternoon at my stitch group trying to re-work the pattern for the woods, and after a few attempts I was quite pleased with it, and started to make another. Partway through the second one I decided to try a narrower stripe (2 rows instead of 3 in the cuff, and 2 stitches instead of 3 in the head) - and was much happier with the look.

Here is the first one with the wide stripe:

During a video call with my parents I showed my dad the prototypes and he agreed that the thinner stripe was more of what he wanted, so I stuck with that for the next two covers. This of course meant that I had to re-do both the first of the smaller covers, and the original cover for the driver, so that they would all match. I took this opportunity to adjust the driver pattern some more to be wider and less tall, to fit the shape of the driver more closely.

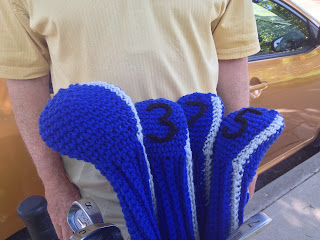
Here are the finished covers before adding the numbers:


Finally I made the black chains and stitched them on for the numbers. I considered making a "D" for the driver cover but finally decided against it since the driver is so much obviously larger.

Here is the picture of the finished set that I texted to my dad to let him know they were done:


My parents came for a visit a few days later, and here are the covers on the clubs:


 And here he is with his new club covers, heading off on a golfing trip.

I think they turned out pretty well  - though they sure are hard to get a good picture of! I've decided to name these covers after my Dad, Mich - though I used the more common spelling of Mitch to avoid confusing people - since they wouldn't exist without him :)


I have just finished writing up a polished version of my finalized pattern, and it's now available on my Etsy store: https://www.etsy.com/ca/listing/156239426/mitch-golf-club-cover-pattern-to-crochet?ref=shop_home_feat 

Like the pattern but don't have time to make them? The custom covers are also available on my Etsy store:
https://www.etsy.com/ca/listing/156335134/custom-mitch-golf-club-cover-made-to?ref=shop_home_active


Saturday, 13 July 2013

Big Surprise Project Revealed - Part 4 (The Home Stretch)


I can't believe how long it has taken me to finish up these four posts and get them posted so you can read this saga. The end of the school year really kept me busy, so I haven't had any time to work on the blog at all - Sorry! Anyway, it's time to finish off this story and show you the end product!


More Delays...


After my last post in November, the truck did finally arrive in Regina (two full weeks after we did) with all of our stuff, so I finally had the rest of the yarn I was waiting on. But by then I was under the wire for making a baby gift for a baby due in early December (the star blanket) and then getting to work on Xmas presents for several of my family and friends (see this post). Also during the holidays I got three orders for items from my Etsy store.


Finally I got back home after travelling during the holidays, and then promptly got a full time teaching job and moved to our new house! This didn't leave much time for crafting. And amazingly, when I did have time, I was scrambling to finish a few more orders from my Etsy store. A good problem to have of course, but I ended up having to put my shop on Holiday Mode so that I could focus my limited crafting time on creating this blanket in time.


By this time it was early March and I was starting to get worried, since I had only about 40% of the squares made for the full blanket pattern I was planning, and we would be leaving for the wedding on May 1. Each night when I was done marking and planning for the next day, I would work on it a bit more, and I took a small project bag with me everywhere. I did my best to use all those typically wasted minutes waiting for appointments and meetings, and I even made a couple of squares while listening to the keynote presentation at Teacher's Convention! I was spending all day each Saturday at the local yarn store The Golden Willow, at their drop-in stitching group, which was good for my productivity, and was also a good motivator. The ladies there were all very supportive, and each time I showed up they excitedly asked how it was going and how close I was now - unfortunately they seemed a little worried it wasn't progressing faster, and frankly so was I.


Here is a shot of the squares I was finishing up on March 29th - when these last two blocks were finished, I was done all the squares of this type. However there were still two more types that weren't quite done yet.. and one had so many left to do...


But finally Spring Break arrived (the first week of April this year), and I vowed to make some major strides during the week off school. My resolve to focus on this project was helped by the fact that I had a bad fall on the first weekend and bruised my tailbone, so other tasks (like finishing the last of the unpacking, an organizing a couple of rooms in the house) were put on hold since I couldn't bend over painlessly. Lots of movies and TV episodes and audio books kept me going while I powered through square after square (sitting on a pillow the whole time).

During Spring Break I decided to start blocking the squares I had so far, so that I could begin assembly. Since this was acrylic yarn rather than a natural fibre, and crochet rather than knitting, I knew that blocking wouldn't be nearly as dramatic as it could be otherwise, but my squares varied in size a fair bit, so I figured it was worth a try. I scoured the Internet for some tips, and found this great tutorial for blocking acrylic yarn. I didn't use her method for making the board, instead I picked up a couple of foam floor mats, and a pile of pins. Using a measuring tape and permanent marker, I mapped out squares on the foam mats, stretched and pinned the squares into place, and then sprayed them with water. I used a cloth to absorb the extra water, and left them to dry over night. While waiting for them to dry I was of course still working on the remaining squares.


The first six squares being blocked

 As usual, anything on the floor (or on the bed, or couch, or table...) is fair game for Nikko to investigate and/or sit on.

After two or three days I had enough squares blocked to start assembly. Using my pattern plan, I laid out the squares for the first few rows on my living room floor. Then I picked up the squares for each row in order and bagged and labelled them for easy access.


To assemble each row I used the dark brown yarn (one of the colours that was least used in the squares), and single crocheted the edge of one square to the other while holding them wrong-sides together to make a raised seam. I was hoping that the dark brown raised seams would unify the various designs, and give a many-paned-window effect.


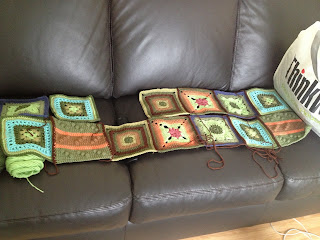
Here are the first few rows all assembled and ready to be joined to each other – starting to look like part of a blanket!


I used the same method to attach the rows to each other, but the seams were much larger and required lots of pins to ensure the blocks lined up just right. Here is the picture of the first two rows that I finished assembling - I was so excited to get to this point...


Nikko seems to approve of the blanket so far...


A friend from the stitching group invited me over for a crafting date during the week, and I put the first few rows together at her place. Here is the blanket after spending the afternoon at her place - the first six rows were in place. It was INCREDIBLY hard not to post this picture on Facebook or on here as soon as I took it. I was so glad finally to have something to show for my months of work, but I couldn't tell the world, just a few friends locally, to avoid spoiling the surprise!


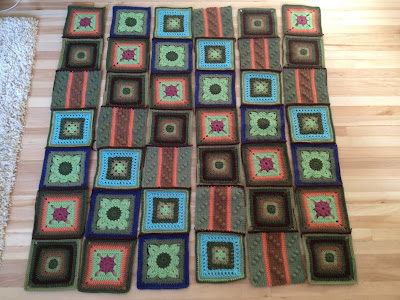
By now I had decided that I probably would not make it to the full length I had originally planned (11 rows long), and that maybe that would have been too long anyway. Instead I figured that I would make a perfect square (7 x 7 squares) and then add two or three more rows beyond that, and see how far I got before I ran out of time and had to switch to finishing: making a border and weaving in the last ends.


A couple of days later I took this picture and then the next day at school I showed it to someone proudly and then nearly had a heart attack - what happened to my beautiful diagonal pattern?


As I looked at this picture, I thought that I has somehow mixed up the pattern on several rows, and I couldn't figure out how it had happened - I had been so careful! That night when I went home and took a look, I realized that I had simply attached the most recent vertical row (on the far right in this picture) on the wrong edge of the blanket! I had marked the wrong corner as the starting point (you can see a bit of orange yarn hanging off the block in the top left corner - I had meant to mark the same block in the top right, but somehow got the blanket turned around! 

So luckily it was only one seam that I had to rip out and I moved the offending row to its proper place:


Now I had a perfect square, and knew that if all else failed, I could stop here, weave in the ends and put a border on, and I would be happy the with the result. This was very good for my stress levels. I still planned to add a couple more rows, but it was nice to know I could stop at any time and it would be ok.

After Spring Break ended of course I was busy again, but I kept carrying my little project bag with me everywhere, and I did by best to finish up the last few squares - the striped block is the one that I had the least of, and it was holding up getting any further on this project. Here's Nikko lying beside me in bed on a weekend morning watching me finish one of these last squares.


On April 20th, I was just one square away from being able to attach my last two rows:

I got it finished later that day, and attached, and then I got to work weaving in the ends from the assembly, and making one final round of the dark brown around the outside before I began my border. Here I am trying to work on this during a board game with a friend who was visiting from out of town that weekend. Oh yeah and of course Nikko was trying to sit on the blanket while I worked - not particularly helpful, but cute as always.


Brown edging done - Nikko looks like he approves of the blanket:

Here we go - all ready for the border! 


When I had almost finished the assembly, I consulted with the ladies at my stitch group to decide on a border. We all agreed that it should be a pretty simple border in one of the brighter colours from the blanket (bright blue, green, or orange) - and finally decided to go with the orange since it is the bride's favourite colour. 

So once the brown pre-border row was done, I selected my go-to-simple-border (#114) from the pattern book Around the Corner, got out my bright orange yarn and got to work:


I finished the blanket (the last of the border, and then weaving in the last few ends) on the Saturday before our Wednesday trip, at my stitch group. What a relief to have it done! Then I packed it up for the trip (it literally took up half of my suitcase) as you can see below:


With this all-important project done, I proceeded to run around like a chicken with my head cut off trying to finish EVERYTHING ELSE I had to do before I left – like all the preparations and sub plans for being away from my four high school classes for four days, and frantically searching for Deep's passport, which turned out to be expired (thank goodness for living in a city with a proper passport office and being able to pay for last minute service!), and packing up everything else we'd need for the trip....

We finally arrived at my in-laws (we had an overnight layover in Toronto and they live two hours away so we stayed with them) and I realized I had no pictures of the whole finished blanket, so we took one before leaving for the airport. You can see my mother-in-law and two of my in-laws' four cats in the picture with me.


In Germany At Last!

When we arrived in Germany and got to our friends' apartment in Halle, I was bursting with excitement to give them the blanket. Her fiancĂ© was out for a bit (trying to find parking for their rental van), and I had intended to wait until they were both there, but finally I couldn't wait anymore. 

When I brought the blanket into the living room I got exactly the reaction I was hoping for: something along the lines of "Holy &*$% Christine! I can't believe this!" She is a crocheter herself, so I knew she would appreciate the amount of work and love that had gone into this blanket. It was nice to hear it though!

It turned out that we were short on blankets that night at her place, so she actually slept with the new blanket, and pronounced it nice and warm. All throughout the visit the bride and groom and her family kept commenting on the blanket - I'm glad it was such a hit!

Shortly after getting the blanket...

On the morning of the wedding...

After the wedding...


And of course, here's the happy couple – aren't they adorable?

Recently in an email from the bride I got the following note:

P.S. Christine your blanket is on our couch and I use it every day to cuddle up and watch episodes of 30 Rock, Big Bang, Community and, of course, Star Trek :)

Makes me feel all warm and happy inside that a piece of me is with her and keeping her company all the way over in Germany - that was the whole point after all.


Here's a picture from today of the two of them - so painfully cute!


And one final picture of the whole blanket:


Well that's the saga, thanks for reading this far.


Keep crafting!

The Big Surprise Project Revealed - Part 2

October 2013

Once I had the colours and the yarn for this project, I had to decide on which blocks to make, and with which colours, and then how many of each block and how to lay out the whole blanket! Suddenly this was feeling a bit overwhelming, but I pushed through, trying to focus on one thing at a time.

Selecting the Blocks

I pulled out my trusty 200 Crochet Blocks book (I've made such good use of that book!), and immediately decided on a few favourite blocks from the group project - particularly the Into the Blue (the blue concentric circles below), Fretwork (the bright blue and green and brown granny-square one below), and Begonia (the brown and green one with a flower in the centre below) patterns.

Next I searched through the book for a couple of blocks that would go well with those three. I decided on Willow (the two-tone green one below), and Ziz-zag Bobbles (the striped one).

Designing the Layout

I took a picture of each of the squares from the pattern book, and loaded them into Powerpoint, and played around with them, creating a few different designs to see what might work. I knew these wouldn't be the final colours, but it was something to start with.

Design #1 is a sort of checkerboard pattern, pretty straight forward and balanced.
Design #2 is a diagonal pattern, using the striped square to create a braided or herringbone look:
Design #3 is inspired by a picture frame.
I sent these three layouts (in black-and-white versions to avoid confusion from the not-yet-finalized colours) via email to my mother and to a couple of friends to get their feedback - and of course they all had very different opinions! I finally decided that design #1 was a bit too boring and "normal", and design #3 would look better as a rug. I thought that the diagonals on design #2 would look like they were flowing, and would look interesting when draped over a couch or a lap (which would be the main uses for a blanket like this, rather than spread out like a quilt). I decided that #2, or some variation on it, would be my starting point, but that no final decision could be made until I had decided on the colours for each square.

Selecting Colours for the Blocks

The colour scheme on the Fretwork pattern (bright blue, with a couple of shades of green and brown) as well as the colour scheme of the Begonia pattern (burnt orange, green and brown), had been the main inspirations for the yarns I had picked.  So I decided to first try to replicate those squares.

I started with the Begonia pattern (see below), which has always been my favourite. I tried to replicate the colour scheme in the book, but my first two tries both fell flat (see first and second below). My colours were too different from those in the book, and the greens were too much of a contrast. So after consulting with my mother-in-law, I came up with the design on the right, which I was quite pleased with. It gives the earthy effect I was hoping for, and it includes those little punches of bright orange and green to liven things up a bit.


Here's the final result (same as on the right above, but better lighting) - I have a feeling this one will be my favourite block...


Next I started on colours for the "Into the Blue" block - which should probably be re-named as "into the green" or "into the earth" with this colour scheme - and again ran into the problem of the bright green and dark green being so different that the effect is jarring.

So I went out and picked up two more greens to add to my yarn supply for this project. I got a medium dusty green (seen as the main colour below), and a lighter medium almost yellowish dusty green. I made the square below and felt better about it, but it still wasn't quite right. I set it aside for the time being and started to work on the other blocks.


Thankfully the other squares went more smoothly overall.

For the Fretwork square I again tried to match the colours from the original pattern, this time with much more success. the only glitch was that it turns out that the beautiful bright blue is a much lighter weight yarn than the rest - I think it is closer to sock weight that worsted! So I ended up using two strands together and a slightly smaller hook for that part of the pattern. It was such a relief to have it work out the first time!


Next on the list was the Willow block. The first 3 colours went in and seemed to fit, but I originally did the edging with the dark green - and it was a bit too green. I also realized that I hadn't used the dark blue yet, so I gave that a try. It seemed to tie the colours together nicely, but I found that the block was a little small - so I added a third row of single crochet to the edging, and that did the trick.


The last block was the one I was least excited to make - unlike the other four (which are made in the round, and with mostly double crochet stitches), this one is made in rows, of almost entirely single crochet. That means it's painfully slow to make in comparison! I knew I wanted this square to include the orange (the bride's favourite colour), and probably green and brown - but which green  and which brown should I use? I experimented with several combinations, including using the orange for one of the larger sections, and pink for the stripes, but I finally settled for this combination, with the lighter brown, the "darker medium" green, and of course the orange for those highlight stripes.

The other annoying thing about making this square was getting the sizing right. It kept coming out too thin and tall. I tried taking out a row or two, but because of the 3 sections of this pattern, I had to take out 6 rows to keep the section even - one on each end of each wide stripe. But then I had an incredibly short and fat square instead, and the pattern was all distorted. So much for that idea! Instead I tried playing around with my tension and hook size. Did I mention that the brown was a bit thicker than the others, and the orange was a bit thinner? That made things even more complex. Finally I seemed to find a combination that worked - but every time I tried it, it seemed to come out a little differently. Oh well, I guess I'll just have to try my best with this one, and try blocking it at the end...?

Ok, so now I had four blocks sorted out, and one almost finished (the "Into the Blue" block that I was still not quite happy with above). Here are the blocks all together so far. Looking pretty good, except for that bright green centre on the Into the Blue block; that definitely had to go. 


Instead of making a whole new square to try something new, I made a new centre (using the lighter medium green) and laid it on top of the already-made square. Ah-ha! I think that will do it.

And here is the finished square - finally!

The five final blocks - at last!


Once I had these blocks finalized, I took pictures of each of them and loaded them back into Powerpoint, and re-created Design #2 with the real colours. Looks ok, but I think the striped block is overpowering, and frankly after making each of the starting squares, I knew that it was going to be my least favourite square to make (and the slowest), so the idea of making so many extra of the design was a little painful. So I needed to create a design that would keep the diagonal idea, without over-loading on any one square.


The arrangement of the other four squares in the above design was a bit complicated, so I decided to keep it simple and use a diagonal line of each of the five squares. Of course this plan calls for 77 blocks (7 x 11) - time to take a deep breath and get started!


Unfortunately now that I've got this finally figured out, we need to start packing for the big move. I'll have to pack up most of my yarn, but leave out enough of each colour to keep me going on the road.

That's it for now, keep crafting!