Sunday 30 December 2012

By Request: Converse-Style Rainbow Baby Booties

I've just completed my first order by request - and here they are! Converse-style rainbow baby booties!


When I recently posted my "Rainbow Collection" of items (with the tag line "Kick the Pink and Blue Habit - Give Baby a Rainbow!) on my Facebook shop page, a friend immediately suggested some brightly rainbow coloured items, to add to the pastel rainbow items I already had.

I thought this was a great idea, and one I've been wanting to explore, so I picked up several skeins of nice and soft, brightly coloured yarn at a nearby store while visiting my in-laws for the holidays. I was itching to make something with these gorgeous colours – the colours are so juicy and luscious I could eat them! – but I didn't know what to start with.

So of course, it was time to use the power of Facebook. I posted a call for requests for my first bright-rainbow items, and within an hour I had a request, (from the same friend who requested the bright colours in the first place),  for "rainbow baby booties! with a white star on the side (like where the converse spot goes)" - AND an offer to buy the first pair! This is my first custom order so I was very excited, and I wanted to get working on them right away.

First I looked up a baby shoe size chart, since she requested a 0-6 months size:


Then I did some Google-image search reconnaissance to remind myself of the key elements of the Converse style - white soles, white cap-toe, white laces, and a white circle/star on the side. Seems totally doable! 


I worked up some white soles from my baby bootie pattern, and checked the size against the chart. Then I started altering my pattern to create the cap-toe effect. The first pair I made the toe was too large, so I started over. I didn't have any white in the same yarn as the rainbow stripes, so I used some Xmas yarn that has a silver thread in it, which produced a sparkly effect. When is it ever a problem to have a little extra sparkle? I did pick up some plain white yarn, so the next pair I make probably won't have the sparkle.

I tried crocheting a star to stick on the side, but I couldn't make one small enough with the yarn I had, so I embroidered one instead. The first attempt (which I made on the shoe with the extra large toe, to practise on), was a bit bulky using white yarn, so I tried embroidery floss and a regular sewing needle instead of a yarn needle to give me a bit more precision, which was a major improvement. Looking at the star it felt unfinished without the circle, so I added a circle around the star, and yup, that was the look I was going for! 


Finally, I added the little embroidered laces, and the effect was complete! Here they are!


I was visiting some friends while I was working on these, and they recognized without me telling them that they were Converse style, so I count that as a win! 

I've now let my friend know that they're ready, and I posted the item in my store so she can order them, and I can get my first sale in the Etsy shop.


Keep crafting!


Tuesday 18 December 2012

Introducing: The Star Blanket


One of my close friends that I grew up with just had her second baby on Friday. I had made her son a blanket (the first one I'd ever made – see it here), so when I heard she was expecting again, I knew I had to make a special blanket for her daughter as well.

I've had lots of success with my zigzag blankets, but I was wanting to branch out and try something new for a while, and I thought this would be a good time. I've had a pattern for a star shaped blanket for over a year now, and it was burning a hole in my project bag. Finally I was going to get to try it out!

As soon as we arrived in Regina after our cross-continent trek, I was itching to get started on this lovely star blanket. The problem though, was that most of my yarn – including all of the baby yarn I wanted to use for this project – was still packed in a box, that that box was on a moving truck somewhere between Ontario and Saskatchewan... and it was taking forever to arrive!

So for the first two weeks we lived here, I had to content myself with the super-secret project I was working on, which was the only project (besides the little critters), that I had brought yarn for. But I was running out of time to get this star blanket made and sent off to my friend before the baby arrived, and I was running out of the yarn I had brought with me!

Finally, two weeks to the day after we arrived, the truck came, at 8:45 pm! Since we're planning to move to our new house early in the new year, most of the boxes stayed packed, or at least mostly packed. One of the first things I dug out of the boxes though, (thank goodness we made a spreadsheet listing the contents of the boxes) was my stash of baby yarn in all different colours!

I agonized a bit about a colour scheme. I was pretty sure I wanted to do another rainbow, but I wasn't sure how many rows the blanket would turn out to be when I was happy with the size, and I didn't have the same amount of each colour, so I wanted to make sure I would be using them up in a logical way, while still staying in rainbow order (seeing rainbow colours in the wrong order drives me crazy!) I eventually decided to start with blue at the centre, then purple before starting the sequence over with pink.


Here are some shots of the blanket along the way:

After one evening's work - already looks like a star


This design was very gratifying, especially at first - I got all the way from blue to yellow (as seen in the first shot above) in one evening – ah double crochet I love how you work up so quickly! And oh yeah, those centre rounds are really short (that's probably more relevant than it being dc...). Of course after that each row started to take noticeably longer to finish, but I was tight for time (not only did I have to finish it asap so I could get in in the mail to ship across the country before her mid-December due date, but I also couldn't work on any Christmas presents until this was finished!) so I took this project with me everywhere. And I mean everywhere.

I even worked on it when we were at a live show where our friends' band Jesse and the Dandelions was playing! Here's proof – I'm sitting at one of the few booths in the venue (almost everyone had to stand), surrounded by flashing lights and smoke from a smoke machine, and yup, I'm crocheting! I sure know how to have fun!


I had a couple of issues with the pattern. It was a bit hard to tell where the middle of the row on each side was, (where the decreases had to happen for the inward points) – but I didn't realize this at first so I wasn't as careful as I should have been... which led to ripping it out and redoing it in some cases, and making adjustments in later rows in other less severe cases. I'm sure no one but another avid crocheter would even notice now of course, but I was definitely more careful in later rounds!

In the end it measured 37 inches from tip to tip, and had 24 rows, for 12 stripes of colour, for a complete double rainbow (although the sequence began in an unconventional spot). It takes a bit of coaching to get it to lay perfectly flat, though it was easier after I washed it and laid it flat to dry (no real point in properly blocking it since it's acrylic yarn, but lying flat to dry does help).

I'm very pleased with how it turned out, and I will definitely be making more star blankets in the future. Here is the whole thing:


And here are some close-up shots - I love the colours:


I folded it up into a 6-layer pile of points and mailed it across the country, with enough time to arrive before the baby:

Folded up neatly into points

And here are the obligatory shots of the little one with her blanket:


Keep crafting!

PS: you can find this blanket on my Etsy store, here

Monday 3 December 2012

Geeky Gifts - More Amigurumi


So as I mentioned in my last post, I got hooked on Amigurumi a couple of years ago around xmas time.

Over the next few months I tried out some animals from the same book I got the hippo and giraffe from this post  - I started with the hippo, then I tried an elephant (I don't have pictures of either of these guys unfortunately, since I gave them away before I thought to take a picture), and they were very sweet.

But as the holidays started to approach, I began thinking of what awesome amigurumi I wanted to make for Deep that year, to follow-up on the Squid Thing and the little jellyfish. I started searching online for amigurumi patterns and inspiration.

I discovered this blog, Geek Central Station, originally because of the tutorials and free patterns, and then I became obsessed with all the amazing little characters this girl and her boyfriend make. I think I read every single post in her blog at the time (and unfortunately, it looks like she hasn't updated her blog at all since then).

Some of the little dudes (as she calls them) are from games or movies or TV shows that I'm unfamiliar with, but the little Lord of the Rings, Star Wars, Firefly, and Futurama characters are so excellent! Honestly I think I spent an entire day reading her blog, always wanting to see what she created next! The crochet part of her little dudes are actually pretty simple (they're almost all the same, with a few exceptions), it's the amazing felt clothing and Sculpey accessories that really make them special. If you want to check them all out, here is the link to all her posts labelled "amigurumi" - keep hitting "older posts" when you get to the end of the page, there are a LOT of pages of posts
http://geekcentralstation.blogspot.ca/search/label/amigurumi

I toyed with the idea of making Luke, Leia, and Han - and started making Leia from her pattern, but I was surprised by how large it was turning out. I tend to like amigurumi best when they're tiny enough to fit in the palm of your hand, so I gave up on that and decided to keep looking for something different.

Around the same time (leading up to the holidays last year) I was looking through the knitting and crochet books in Chapters, looking for inspiration for a gift for my friend Jenn (again, names are changed for privacy); who was also into crochet, and had also started making animals from the same pattern book I was using. Suddenly I found this book called Creepy Cute Crochet, and knew I HAD to get it for her. Not only were they super cute, but she also has a younger sister who has a sort of morbid sense of humour, and I knew she would want to make a least one of these little creatures for her sister. In fact, she ended up making one for each of her sisters :)


One of the patterns in this book was for a "Cthulhu" (something I hadn't heard of before at the time - you can see what it is here: http://en.wikipedia.org/wiki/Cthulhu) which is some sort of creature with tentacles coming out of its face. When I saw the little crochet version in this book, I immediately thought "If I made that in pink yarn, it would be a perfect little Dr. Zoidberg from Futurama! So I made a few notes from the pattern in her book, so that I could make a little Dr. Zoidberg - we love Futurama, and have seen all of the episodes several times now.

Turned out that I had some intense pink yarn in my stash at home already, so I whipped up a little Zoidberg. I know, I know, he doesn't have enough face-tentacles, but really, how was I supposed to fit more tentacles on that tiny face? Also, I probably should have attempted to make little claws for his hands, but that seemed like a lot of work... by the time I was at that stage with this guy, I was more excited about the other character I was making (see below), so I wanted to spend more time and energy on that one, rather than trying to figure out claw-hands.

I made his little lab coat out of felt, and his little stethoscope (which even comes off) and his adorable anime-style eyes, out of Sculpey - both material choices were of course inspired by the Geek Central Station characters. They're nowhere near as precise and amazing as the ones those two make, but I think they're not too bad for my first amigurumi with clothes and accessories!

The design for the Sculpey eyes also came from the Creepy Cute Crochet book - it's part of what makes those characters so amazingly cute. I had learned my lesson from the first burnt botton-eye from the Squid Thing the year before, so I made several pairs of eyes (in different styles, including the big ball style from Futurama) and cooked them REALLY slowly in the oven, so they wouldn't burn, and then tried the various different styles on him, but non really worked except these ultra-cute ones, so I went with them, even though they aren't terribly accurate to the show.

Since his body is essentially a ball, he had a tendency to tip over, so I added some poly-fill pellets at the bottom to make him a little more stable. In hind sight I probably should have added more, since he's still pretty tippy - but then Zoidberg is pretty bumbling and klutzy, so it sort of works. Right?


I still wanted to make a Star Wars amigurumi - Deep loves Star Wars, much more than he likes Futurama. So I started poking around online for other star wars patterns, and I came across a free pattern for R2D2 - and I started making him... I was about half way through when I stumbled upon this post - for a much more amazing R2D2, so I immediately tracked down the creator on Etsy, ordered the pattern, and started over.

It's actually amazing how many Star Wars patterns there are on Etsy - I particularly like this set. Ah well, maybe another year. By the time I started over with this new R2D2 pattern, I was really cutting it close. In fact, even though I had the crochet part (which is fairly simple, except the legs, but they're pretty quick too) done a couple of days before xmas, I spent all day on xmas eve doing all the fiddly bits with felt and beads and silver ribbon that make this guy really special.

Again, I was very thankful for the way Deep is quite oblivious to what I'm working on 90% of the time, since I was doing all of this while sitting in a chair next to the couch he was on, while we watched movies all day. I just sort of twisted my body so that I was blocking what I was doing - got quite a crick in my back and neck as a result - but it worked! The pattern I had ordered had a page you could print out that had the exact size and shape of the little felt bits - I wish I had been able to use an exacto knife or something though, instead of scissors - those little pieces on the front were really tough! Anyways, here he is, definitely the coolest amigurumi I've made so far - this one impresses people more than anything else I've made. And so cute!


Here are all the amigurumi that I've given Deep (minus the little jellyfish which is still packed in a box so far - and Zoidberg's stethoscope seems to have gone missing too...) to date, all hanging out on a shelf together. Huge difference in size, huh?


Now before you start judging me by the books on this shelf, these books belong to the owners of the house we're renting for a few months, so none of them are ours. But they're just travel books anyways, so that's ok - there are much stranger books in this house, trust me.

Ok, back to working on this year's holiday presents. Posts about those to come after the 25th!

Keep crafting!

How I got Hooked on Amigurumi

Well at this time of year, as I'm up to my ears in projects that are destined to be presents for loved ones this holiday season, I REALLY want to post about those projects I have on the go... but of course
since most of my family and close friends are readers of this blog, that would certainly spoil the surprises! So I have to be patient and wait until AFTER I've given these gifts, to tell you about them. But rest assured, those posts are coming.

Therefore, I'll have to satisfy my urge to share by telling you about the Amigurumi I've made in previous years.


What the heck is an Amigurumi?

Amigurumi is a Japanese word meaning a crocheted or knitted stuffed toy. As this Wikipedia article says, the "pervading aesthetic of amigurumi is cuteness"  - that is, they are created particularly
because they're adorable! Apparently, the most common items for sale on Etsy are Amigurumi or Amigurumi patterns - so clearly they've become very popular recently, and for good reason. Beyond being adorable, they're very quick to work up, and make great little gifts, especially when it's a reference to something that person really likes, or that you share an interest in. Of course they also make great toys for small children, as you can see in this post.


My First Amigurumi

The first Amigurumi that I made was a creature from the movie Coraline. Deep and I love Coraline - it's such an excellent movie. If you haven't seen it (and I've realized recently that too few people
have seen it!) then I suggest you give it a try next time you're looking for a good movie. It's a clay-mation movie, but it's not for young children, it's actually quite dark and a bit creepy - but definitely excellent.

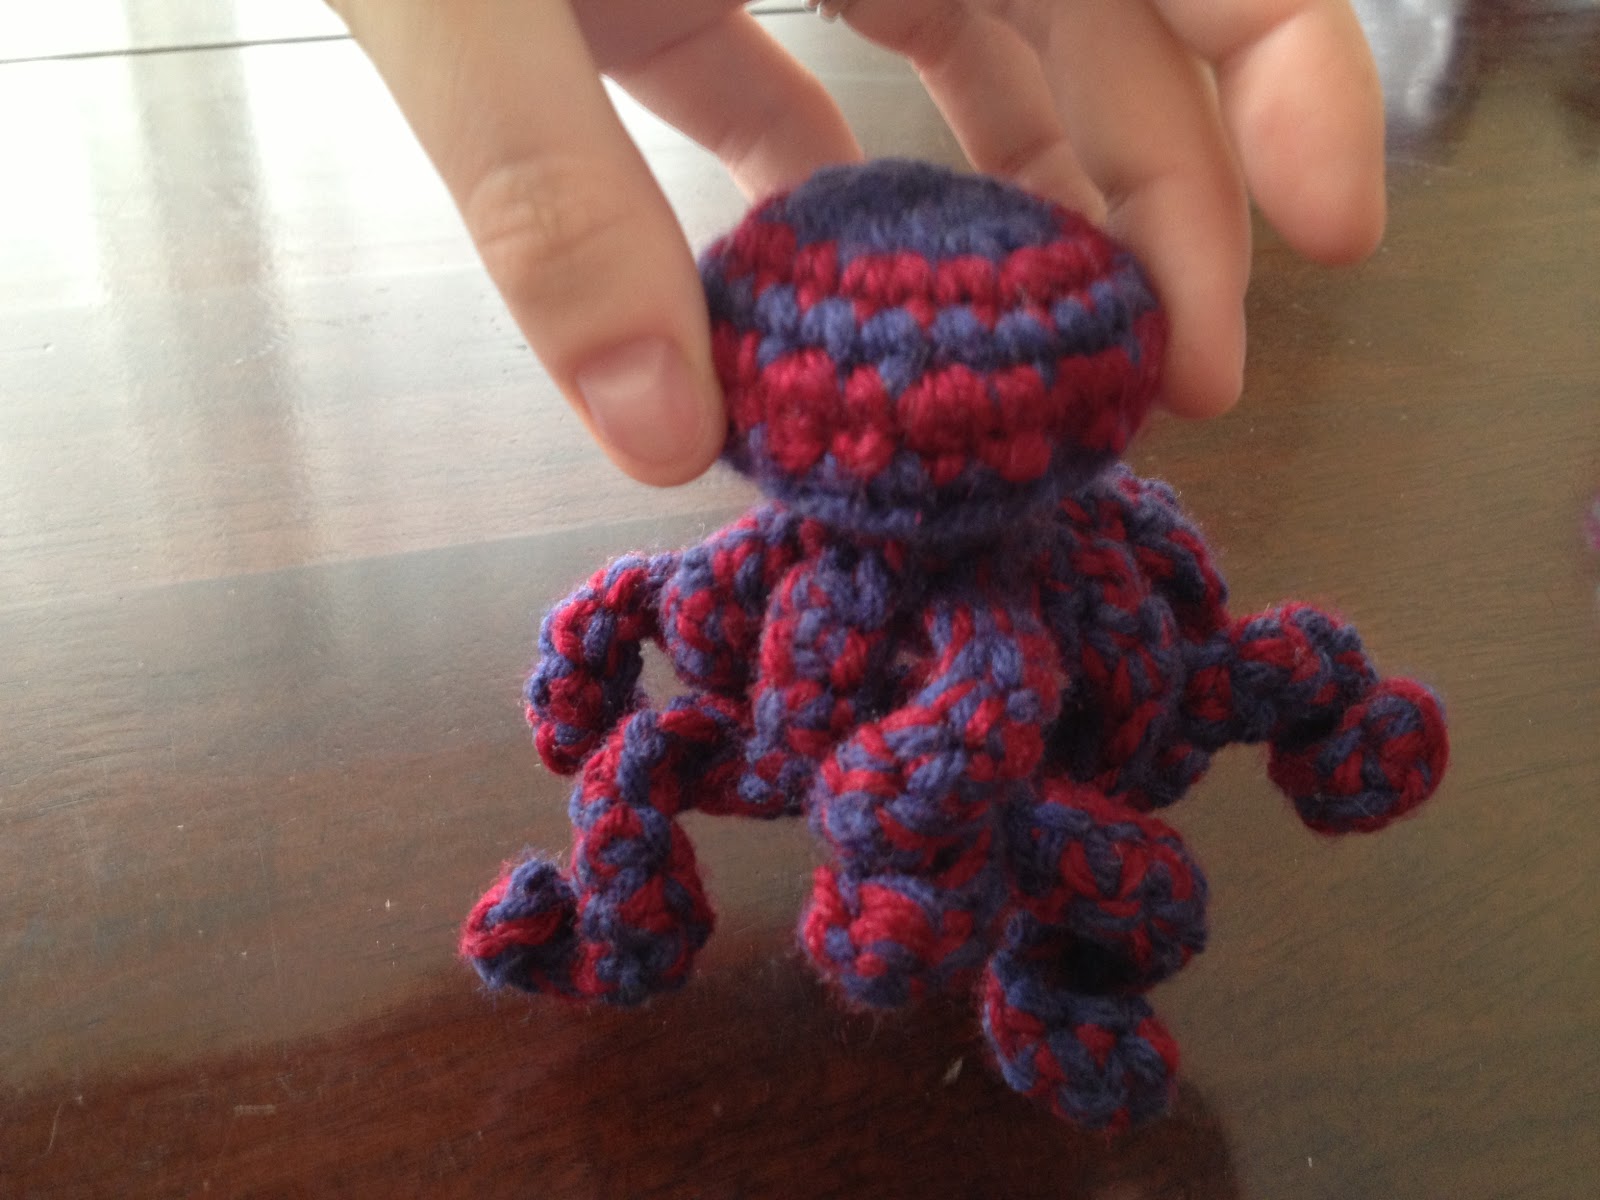
Anyways, a couple of years ago, when we were watching Coraline for about the 4th time - showing it to another friend who hadn't seen it yet - we noticed a strange octopus or squid-like stuffed animal on the shelf in Coraline's room, with one big button eye. Deep decided that this creature was really interesting, and a few minutes later he announced excitedly that he had found a crochet pattern online to make this creature (you can find it here http://blog.joanofdark.com/2009/02/weird-octopus-cyclops-kitty-thing-from.html). I laughed and said I'd make it for him for Xmas if he wanted, and he was very, very pleased by this idea.


That  December we were moving east from Alberta to Ontario, driving across the country (this was before we got Nikko, so it was a much less painful drive with no stir-crazy kitty in the car) - so I made
sure that I had some lovely bright blue yarn with me in the car, and some stuffing, and of course my crochet hooks and this pattern, so that I could spend the long days in the car working on this creature.
Again, this was my first time making anything 3D (besides little baby hats), so I didn't know what to expect, but I gave it a try. For one thing, I didn't know, as I do now, that with amigurumi patterns, you
don't join the rounds with a slip stitch and then start a new round, you just keep going around and around to avoid making a seam - so there is an awkward seam at the back of this creature as a result.

I had also never heard of the "magic circle" technique before, so I had to look it up online one night at our motel. This is an alternative method for starting crochet projects in the round, that allows you to adjust the size of the starting opening. Googling "magic circle crochet" will provide several video and picture tutorials on this method, which is a great trick to know for amigurumi projects, and anything else made in the round.

AND, I also didn't read the pattern carefully enough to see that this pattern was for a felted creature (which, if your'e not aware, means that you make it out of wool, and make it extra large, and then put
the finished item in hot water afterwards to shrink it and cause the fibres to felt together) - so I was shocked at how large it was becoming - especially since I hadn't made it out of wool, so I couldn't felt it anyways. But Deep thought the extra large size was a bonus, so I kept going. I had just about finished the head/body part (it looked quite a lot like a bright blue misshapen rugby ball), when I realized that I was almost completely out of yarn - again due to the fact that I was imaging a much smaller finished product. So much for finishing this project on the drive!

Once we got to my in-laws place in Ontario, I had to go to a couple of different craft stores before I managed to get more of the same yarn (one place didn't carry it at all, another had the right yarn, but not the right colour..), and I also picked up some Sculpey to make the button eye. I had picked up some overlarge buttons to use for the eye before we left, but since I'd grossly underestimated the size of the creature, they were all clearly much too small.

So I made the legs, and the "ears" (as described in the pattern, which refers to this creature as an octopus-kitty, though another reader pointed out that it's actually a squid, and those are fins, not
kitty-ears), and it was starting to come together. This required learning another new technique - picking up stitches. This is where you literally use your crochet hook to grab a stitch in your already
finished section, and start crocheting into that as if it were your previous row - this allows you to create pieces that stick out from the original piece in one step, instead of making the new body part
separately and sewing it on at the end. As you can see in the pictures below, the legs didn't end up being all the same size, but since it is a quirky creature to begin with, I think that kind of fits with its
"personality"... right?

Finally, I had to make the single giant button eye. I'd never really used Sculpey before, so I was a little apprehensive, but I made a giant button, and put it in the oven.... actually, I tried the toaster
oven first, using the instructions on the side of the package - and it burnt. It came out looking like a burnt button-shaped cookie! Luckily I had only used about half of the package of Sculpey (it's a big
eye!), so I bravely made another button, and used the real oven this time.. and a much lower temperature and watched it like a hawk. Finally I took it out and let it cool, and it was hard! And not burnt! Success!

I used some black yarn to attach the eye, and voila! Here is the finished "Coraline Squid Thing" as we call it:

Also while I was experimenting with the Sculpey, I realized that the package said "Glow in the Dark"! I had intended to buy something that was simply off-white, but apparently that colour I'd selected was
actually glow in the dark - what a bonus. So this strange creature from a slightly creepy movie, gives off an eerie greenish glow when the lights are turned out!

Here is the squid-thing sitting next to Nikko, for some perspective on its final size. You should know that Nikko is a fairly small cat too. I'd love to include a picture of the eye glowing, but I don't think I
could get a good shot of that.


This squid thing now tends to live on a book shelf, and often it gets shown off to people who come over to our place for the first time. You know how people often check out the books at someone's house, to get an indication of their personalities? Well whenever they do that at our house, they see this creepy dude too - It's actually a pretty good indication of how quirky we are!


Some Aquatic Friends for the Squid-Thing

Fast-forward a couple of months, and Deep's birthday was approaching fast. I was trying to think of something small and fun to give him as a surprise, besides whatever it was that he had asked for (asked-for presents are a bit anti-climactic to give since they aren't a surprise). While exploring Etsy with a friend I had just taught to crochet, I stumbled on a pattern for little crocheted Jellyfish! [Whoa
- I just searched Etsy for "jellyfish pattern" to try and find the shop so I could provide a link to it... wow there are a LOT of crocheted jellyfish on Etsy now! Unfortunately I can't find the listing again to post the link here - but here is her website http://aliciakachmar.com/] They were so sweet and adorable, and I thought they'd make some nice litte friends for the Squid Thing, so I decided to make a little pod of jellyfish for Deep for his birthday.

Good thing he is a bit oblivious and doesn't pay close attention to what I'm crocheting most of the time, because I made two out of the three while we watched movies, with me sitting right next to him! I made the third on the morning of his birthday, before he'd gotten out of bed.

They were a perfect little surprise, and they now keep the Squid Thing company on the shelf.

Unfortunately in our most recently move, one of the three little guys has gotten separated from the others, and is packed some where in one of the still-packed boxes so here are the two I could find this
morning:


The pink and turquoise one is made with thinner yarn, either sport weight or baby (I can't remember which now), so he turned out a bit smaller than the red and blue one which was made with worsted weight.


I love the way the little tentacles curl up on their own - it's a long row of chain stitches and then a single row of single crochet, and then you just give them a little twist and they stay that way!


Nikko is clearly too sleepy to be particularly interested in this little guy at the moment. We have to keep them up on a shelf he can't reach, or they get tend to get batted all around the house.


After these two projects, I was definitely hooked on these Amigurumi - one of my favourite things about crochet is how perfectly it lends itself to creating 3D shapes, and how flexible it is, so you can make pretty much any shape you can think of. Of course you can make 3D shapes, including stuffed animals etc, with knitting too, but it requires double-pointed needles and just overall seems like a lot more work (largely because I haven't tried it yet, but it must be trickier!).

As a result, there are a lot of great crochet patterns out there for amigurumi, in books, on Etsy, and on various craft blogs, but it's much harder to find patterns for knitted animals and creatures. A friend of mine, who has recently opened a Zibbet online store (The Elephant Emporium) where she sells the knitted animals that she designs and makes (I'm very impressed), has told me that she is jealous of crocheters because we have so many more great patterns for amigurumi available to us. It's pretty rare that there are more patterns any category for crochet than for knitting, since there are so many more knitters out there; so if you love these amigurumi, it's a great reason to learn to crochet!

More amigurumi posts coming soon...

Keep crafting!

Wednesday 28 November 2012

The Great Leap


Well, I've been considering opening an online shop for some of my original crochet creations for several months now, and I've finally done it.

I've got an Etsy Shop:
http://www.etsy.com/shop/dreamycrochet

I hope the name isn't too sappy... if you hate it and have suggestions for a better store name, please let me know. "StitchThisFreud!" was too long unfortunately.


I've also made a matching Facebook Fan Page, since almost everyone I know spends a decent chunk of their time on Facebook these days...

https://www.facebook.com/DreamyCrochet


So if you like what you've been seeing here on my blog, then you might want to check out my shop, or pass it on to a friend or family member. I'll keep adding new items as I create them - but first I have to make it through the Holiday Gift-Making Madness period.... more blog posts to come after that too!


Keep crafting!

Sunday 18 November 2012

Road Trip Safari

We recently moved from Guelph, Ontario, to Regina, Saskatchewan. That is a really long way, more than half the width of Canada, if you’re keeping track. And we decided to drive, so that we could take our car with us without having to ship it (especially when paying by weight…), and so that we could bring our cat without taking him on a plane.


As it turns out, my husband Deep loves to drive and really hates being a passenger, whereas I would much rather do something fun like crochet, than be the driver. So even though I always offer to take a turn now and then, it was a safe bet before we left that he would drive the whole way (he did). So, I packed up a bunch of yarn for a couple of different projects (including yarn for the super-secret project that you will hear all the details about in a few months when it's not a surprise anymore) into one of my shoulder bag carrying cases, and gave up about 1/2 of my already minimal leg room in the car so it could be accessible throughout the trip.

However I didn't get much chance to crochet on the drive after all. There were two main reasons:

First of all, we decided at the last minute to go through the US instead of through Canada (north of Lake Superior) as we'd originally planned. This was beacuase the Trans Canada Highway was washed out (!!!) near one isolated community, and there is basically no way around that section of road. And it would be at least a week before the road would be fixed. So our best option was to go south of the Great Lakes, through the US. This change in plans actually resulted in 3 days of driving instead of 4, which was a much better deal, but obviously cut down on crochet time.

Secondly, our (usually friendly and cuddly) cat Nikko, who happens to hate car rides, acted slightly to moderately insane for maybe 50% of the drive. This involved him complaining loudly using very strange noises, all while exploring the car full of our stuff. As a result, I had to keep my hands available for a large chunk of the time, in order to be able to deal with him... you know, little things like keeping him from leaping under the pedals (and thereby killing us all), or attempting to quiet him down to avoid making the driver completely crazy from frustration and annoyance.

So… needless to say, I didn’t end up with very much time to crochet. There were times when he finally fell asleep, or at least was calm for a while, and during those times I could finally crochet. I used most of this limited time to make a couple of gifts for some friends’ kids in Regina. And that is what this post is really about (I bet you were starting to wonder...)

We didn’t know many people before we got to Regina, but the one family we knew best was a couple where the husband is now one of Deep's co-workers. They have two very sweet children: a girl who is 4, and a boy who is almost 2. They have been really great for the last few months, making us feel like we would have a community when we arrived, and being really excited that we were on our way. So we thought it would be nice to show up with some kind of small gift for the kids when we finally made it to town. Of course, since I'm crafty, I decided to make something cute and crocheted.

Before I left, I made sure that my craft bag that was in the car with me contained my handy little pattern book of adorable amigurumi (that is, small knitted or crochet creatures) animals (this book from Lion Brand: http://www.amazon.com/Crochet-Critters-Leisure-Vannas-Choice/dp/1601404956), a few different fun colours of yarn, and some polyfil beads and some fibrefil stuffing.

After some deliberation (they're all so painfully cute!), I decided to make a purple hippo and a yellow and orange giraffe. Here you can see me working on the hippo, with Nikko (finally!) asleep  in my lap.


I almost didn't have enough stuffing, so I used more of the beads that I usually would, which made it a bit more difficult to manage in the car, with no flat surfaces and so much potential to spill them everywhere. I thought we were going to have to stop at a craft store for some more stuffing when we got to town, but I just managed to make it work with what I had. The upside of this is that they ended up being a little more stable (particularly the giraffe, who is a bit top-heavy as you can see), so that's good.

I also forgot to pack any of the tiny buttons that I usually use for eyes, so I had to improvise with some black yarn. I guess these eyes are a bit more baby-safe anyway, so that's a bonus.


Here they are, the night we got to town, all ready to meet the kids!


We had this family over for dinner the second night we were in town, and I told the kids I had a surprise for them. I pulled out the animals, and while the girl was trying to decide which one she wanted, the little guy came running over and grabbed the giraffe by the neck - It was so cute! The kids played with them all evening, clearly they were a hit. The next day I was told that the little girl had fallen asleep holding the hippo to her chest. She even came up to me the next day and thanked me in a shy voice for making her the hippo - very sweet!

Here is a shot of the two of them holding their new friends. Aren't they cute?


I'll post more about my previous amigurumi creations later, so stay tuned.

Keep crafting!

Monday 12 November 2012

Crocheted laptop & tablet sleeves for everyone!

Shortly after I made the crocheted laptop sleeve for myself (see the previous post), I started getting compliments on it, and even a few requests.

My aunt saw my case while we were visiting them in the early spring of 2011, and I offered to make one for her laptop if she'd like. She seemed tickled pink by the idea, so I made a note of the size and model of her laptop, and took her requests for colours - Teal and Grey/Silver.
I tracked down some yarns in the right colours (sometimes it's really hard to find the right shade of silver/grey yarn - have you noticed the same thing?) and got to work right away... and then got side-tracked. I'll come back to this project in a moment....


One of the things that side-tracked me was the idea of making a case like this as a surprise gift for my really good friend who we'd recently moved far away from. {Ok, since I'll probably mention this friend a few times throughout my blog, let's give her a code name now... let's go with Jennifer.} She loves the colour orange, and I had this ball of really unique variegated orange yarn that I had set aside to use for a gift for her. So I decided to use it as one of the 3 strands in a case for her laptop. Unfortunately this turned out to be an ill-fated project...

I got some orange solid-colour yarn to compliment the variegated stuff, and some yellow and some pink as possible other combinations, since the special yarn included both yellow and pink highlights. I selected one of them (I don't remember which...), and started working. When I started, I asked Deep "Jennifer has exactly the same laptop as you, right?" and he said "Yes" - so I started working on the case, using his 13 inch Macbook Pro as a guide (can you see where this is going...?). 

One evening a week or two later I was working on this case and was maybe 3/4 done, while my brother-in-law and in-laws were over for the evening. My brother in law has the same laptop, so at one point I asked to borrow it to check the sizing, thinking I could finish it and send it by the next day. At this point Deep says casually "You know Jennifer's computer is the 15 inch, right?" (apparently when I had asked if they had the same laptop, he had thought I meant the same type, not the same size). My heart stopped.  

I cursed and fumed for a few minutes, feeling like an idiot for not being more careful when I started (or for asking more specific questions)... then went and looked up the dimensions of the 15 inch laptop online and concluded that there was no way on earth this case would be able to stretch that much. And I started to pull it out. My father in law said something about how much he liked pulling things out, and I handed it over to him. At least I didn't have to pull out all that work myself... so I tried to ignore the gleeful expression on his face as he did it. Then I rolled the 3-strand "yarn" (since for this pattern you work with 3 strands as if they were one) into a big ball so I could begin again.

I started over, this time adjusting the pattern to make it large enough for a 15 inch laptop. I got maybe halfway through the significantly larger case, and realized that I was definitely going to run out of that ball of special yarn. I searched everywhere for that yarn again - the original ball was from my mother-in-law's yarn stash, so I have no idea where it came from - or for something that would be similar enough to be able to substitute. But I had no luck. So I pulled it out all over again. This time though, I had to untangle the triple yarn into the 3 colours, since I had to switch out another strand for the original special yarn I was intending to use for this project. A friend and I spent an entire evening pulling it out a bit at a time and untangling the 3 yarns and rolling them each into a neat ball. 

Finally it was time to start over, for the 3rd and hopefully last time. I decided to just use the orange, yellow, and pink solid yarns. I would save that ball of special yarn for another project, another time. By this time Jennifer's birthday was approaching quickly, so I decided that it was too late to have this be a random out-of-the-blue "Thinking of you" kind of present, and that I would make it a birthday present instead. Her friend was planning a surprise birthday party for her, so I arranged that I would mail the case to another friend, so that she could give it to Jennifer at the surprise party. I scrambled to get it finished in time, and paid the procrastination tax of expensive shipping to get it there in time. Just before I sent it, I wanted to double check that it would actually fit, so I walked into a nearby electronics store, and tried it out on one of the floor models when none of the sales people were looking.

The surprise party worked out well, and Jennifer was very pleased with the case. Here's a couple of pictures of it:


She uses it all the time. And, as it turns out, last year it actually saved her computer - when she slipped on some icy steps and her backpack went flying, and fell so hard onto the pavement she was sure her computer was toast. But luckily it was in its cozy case, and it ended up having only minor dings - but it still worked just fine. I think that's pretty good testimonial for these cases, if I do say so myself. I'm glad all that trouble in making it paid off in the end, with a well-loved and apparently very useful gift!


Back to the case I was making for my Aunt. When the ill-fated project was finally finished, I eventually got back around to finishing the case for my aunt. A friend had the same model laptop as my aunt, so i tested the size on his when he came over for dinner one evening. I had intended to mail it to her, but instead I ended up bringing it to her in person when we went to visit the family cottage that summer. Here's how it turned out. I quite like the colours - the teal really stands out nicely against the silver and charcoal. Very sophisticated I think.


Then last Christmas I decided to make cases for my parents too - a green and blue one for my Mum's new-to-her 13 inch Macbook Air (so a larger version of mine), and a brown and grey case for my dad's iPad. By this time I realized that the cases tend to stretch out a fair bit over time, so I made their cases quite a bit tighter. Again I went to Future Shop to try out the cases. This time I told the sales guys what I was doing, a bit sheepishly "I made this for my Mom for Christmas and I want to make sure it will fit - is it ok if I try it on here?" - they were actually really friendly and helpful about it and were quite impressed that I had made it myself. It was trickier to try on the iPad, since the locking mechanism on the iPads in the store is on the back, instead of at one end, but I could at least try it on the bottom third or so, so I knew it would go on - but there was no doubt it would be snug!

I wasn't able to go home for the holidays last year, so we opened presents with my parents over video-conference at my in-laws place. The cases fit! Later my dad said that he'd gotten a few comments on his nice hand-made iPad case from store clerks etc., and he's always very proud to say his daughter made it for him. :) And yes, thankfully they did stretch out enough to make them a little easier to use!


A few months ago a friend of mine who was on a volunteer board with me got a new iPad, and he loved it and brought it to meetings with him and everything. But then I saw then he was carrying it around in the box that it had come in. I asked him about this and he said he didn't want it to get damaged, and he didn't have a case for it yet. So of course I made him a blue case for it that weekend, so he could start enjoying the portability of his new device. He must have thought my original offer wasn't serious, because he was very surprised when I showed up with it at our next meeting.


And finally, when Deep got a new computer (he had managed to drive over his old one with our car, so the screen was all cracked, but miraculously it still worked for a few months until the new model that he wanted came out), he asked me to make him a crocheted sleeve for it. I generally don't offer to make him crocheted things very often, since he has a particular sense of style and I don't want to end up with a situation where I work really hard on something that he won't really like but he will feel guilty enough to use it occasionally. So I was pleasantly surprised when he asked for this, and made this nice blue and grey case, which he does actually use all the time:


So, long story short, I've made quite a few of these cases, in pretty well every size and colour you can think of. I've also taught a couple of friends the pattern so they have made cases for themselves. They definitely seem to be a hit!

I've been thinking that I may open an Etsy store soon, to sell these custom-made cases, since there does seem to be some demand for them. I guess we'll see how that goes!


Keep crafting!


PS: You can find these items on my Etsy Store