Tuesday 22 January 2013

Xmas Gift Crafts Part 1 - Slippers Great and Small

Ok, now that all the gifts have been given, I can finally tell you about all the projects I've been working on! So here is a brief showcase of some of the gifts I made for family and close friends this year. I've split this post into 3 parts to make each post a reasonable length.


Xmas crafts Part 1: Slippers Galore!

I made four pairs of slippers for gifts this year - for both my parents and both my in-laws.

Quick and Chunky Slippers:

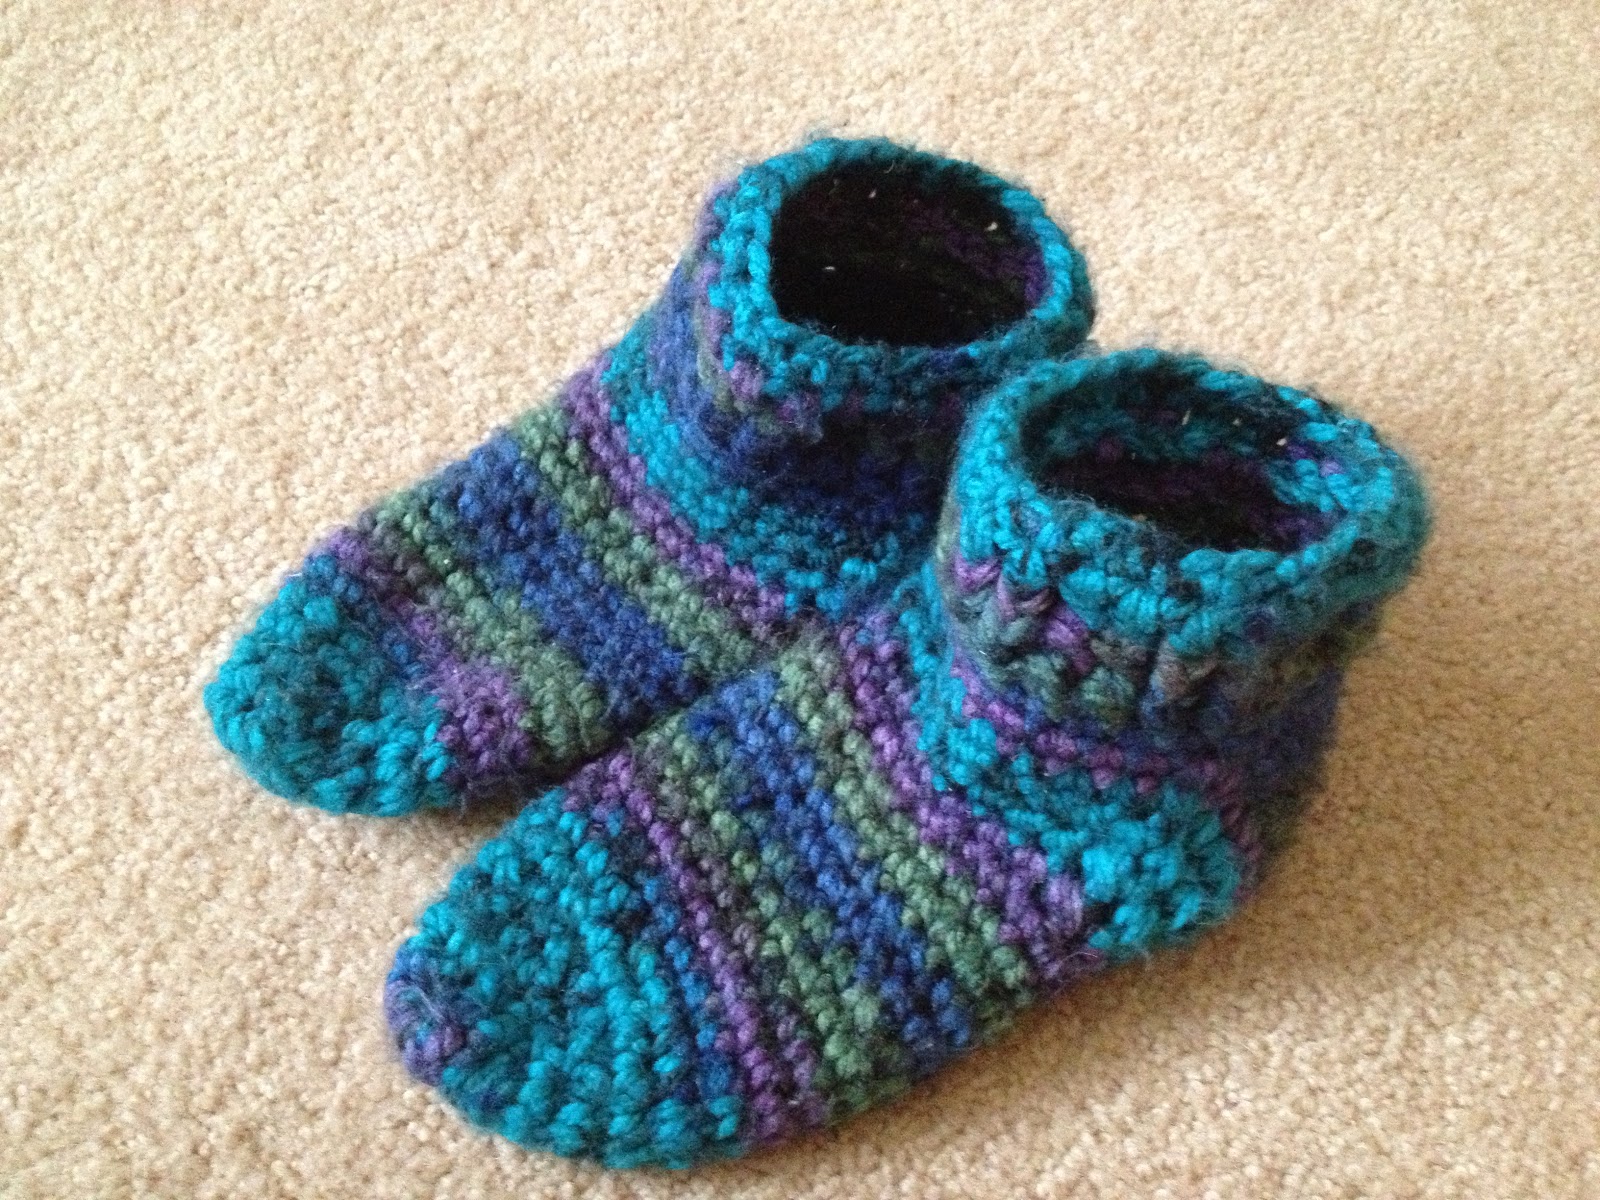
For my mother and my father-in-law, I made these chunky bootie-type slippers, using bulky weight yarn, using this pattern I discovered and adapted for myself before the holidays. I used the same type of yarn as I had for my own pair of slippers (Loops & Threads Charisma), selecting different colours for each of them. Most of the Charisma yarn is in multi-colour skeins, which makes for really interesting designs on the slippers, with a relatively simple pattern. I chose a Grey, Black and Brown yarn for my Father-in-law, and a lovely earthy yarn in Greens and Browns for my Mum.

Here's how these two pairs of slippers turned out:

Grey, Black and Brown Slippers in Men's size 8 for my Father-in-law


Green and Brown slippers in Women's size 9 for my Mum


Lizzie Slippers:

For my mother in law, who is often too hot even in the winter, I knew she wouldn't like the thick, chunky slippers. So I made her a pair of Lizzie slippers instead. These come from a great pattern on one of my favourite craft blogs http://goodknits.com


They're just so sweet and stylish and original! One of these days I'll have a chance to make a pair for myself!


An Ill-Fated Project:

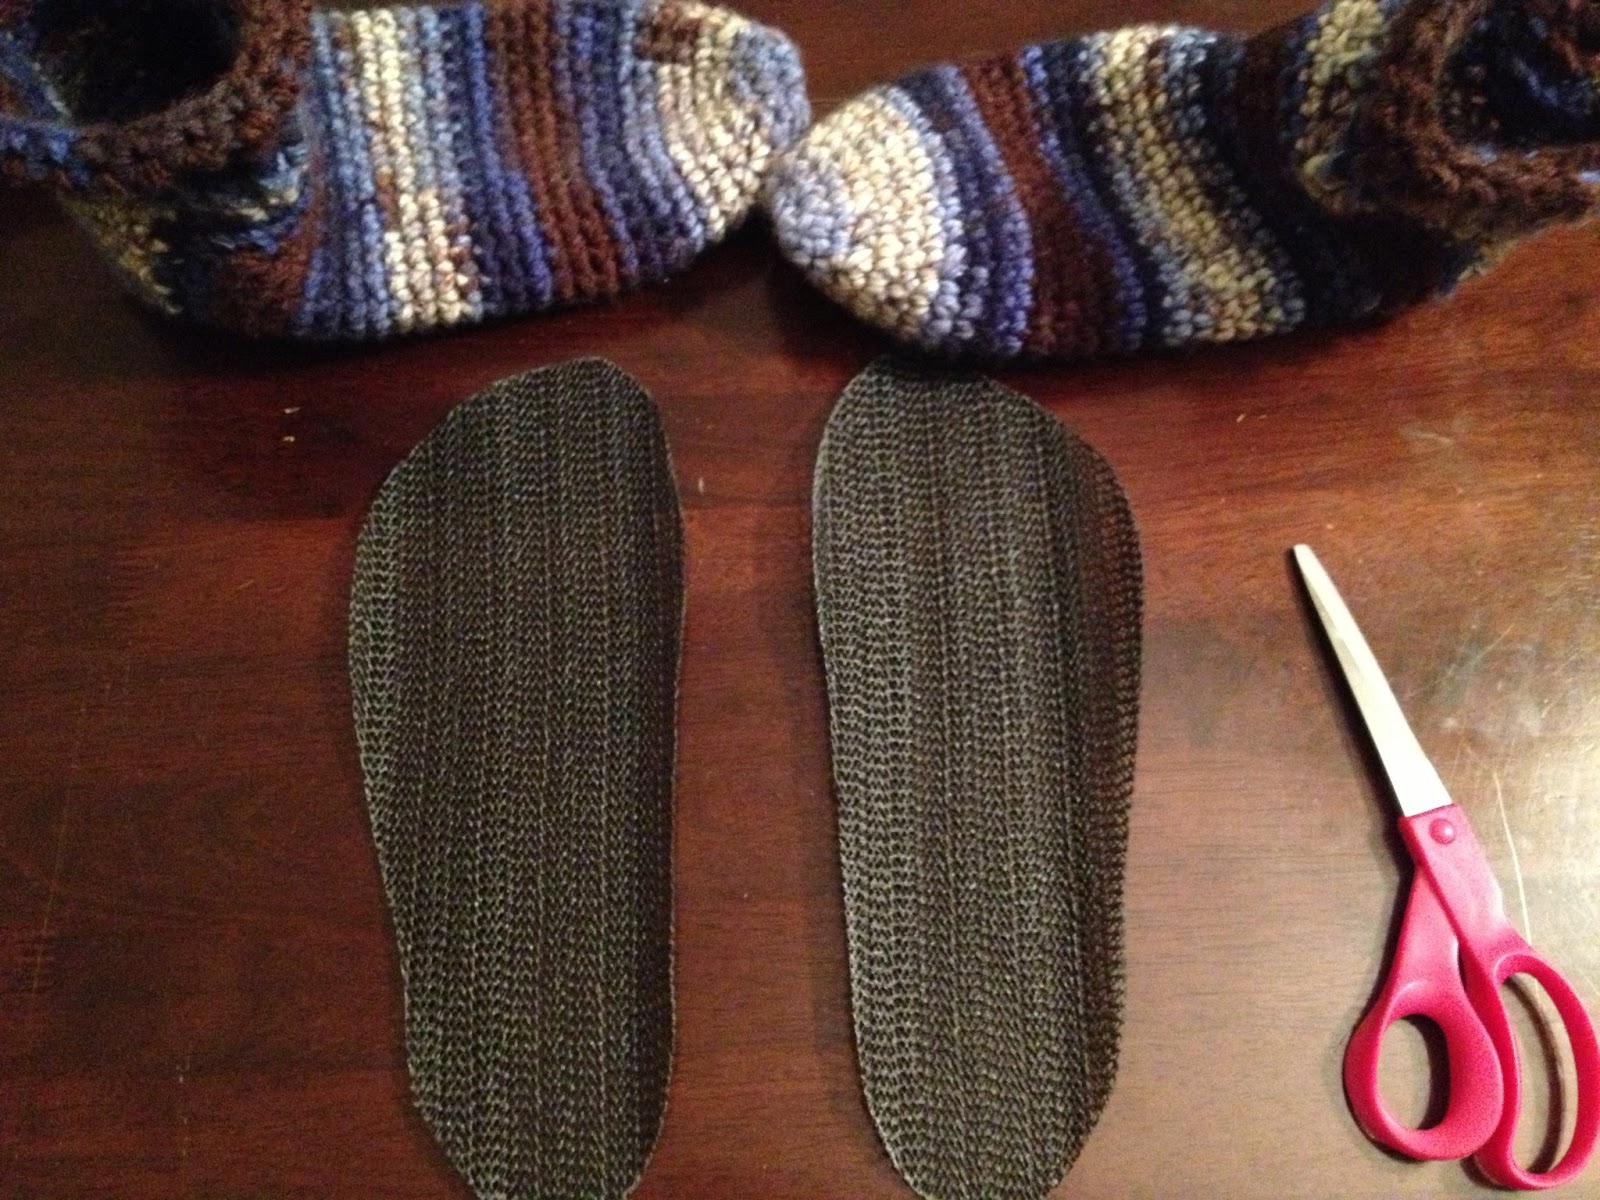
I was originally planning to make the same type of Chunky slippers for my dad too, but at the end of November he mentioned that he had worn right through the soles of some slippers that a family friend had knit for him a while ago - so I picked up some of these leather slipper soles (called Boye "Starting Points", found at many craft stores), to make a pair of slippers with really durable soles.

I had picked up the largest size of these soles available, which was labelled "Large - Women's sizes 7-9, Men's sizes 6-8." Since my Dad's feet are size 9.5 or 10, I had a sinking feeling about how this would turn out. However when I measured them against charts I found online of foot length by shoe size, it seemed possible that they might work out afterall - (maybe the manufacturers were off a bit in their sizing...). So I crossed my fingers and made them anyways, hoping for the best.

I intended to find a pattern for them online that I could at least use to get me started. Turns out that the only patterns I could find for these slipper soles was this list - most of which are knitting patterns, and the couple that were crochet patterns didn't appeal to me at all.

Therefore, I had no choice to make up my own pattern. Luckily my friend in Regina has a pair of slippers that she bought (and loves), which are built on soles similar to these ones, so I could at least take a look at hers to get an idea of how to start. It turns out that her slippers actually only used half of the teeny-tiny holes that are punched around the edge, and they clearly cut them to be bigger. I was planning to try using all of the holes, so I clearly had to change my pattern significantly from what had been used for her slippers – unsurprisingly it turned out quite differently. I am quite happy with how the pattern turned out, and I will post it here as soon as I've had a chance to write it out properly.

Unfortunately, while I was working on these slippers I managed to break one of my lovely wooden Harmony crochet hooks (which were a birthday present this year) while using it to try to get the yarn through those tiny holes - arg! Word to the wise - always use a metal hook when dealing with a tiny hole in leather!

Despite my concerns about sizing, and the crochet hook tragedy, here is how they turned out:


Unfortunately, that was not the end of the story - my worst fears about this present came true, and they didn't fit. Yes, he could get them on his feet, but they pinched his toes and were uncomfortable to wear. Not exactly the feelings you want from a new pair of slippers! ARG - So much for that present!

Over the next few days I searched online and everywhere I could think of for a larger size of this type of slipper sole, with no success. I finally decided to make another pair of the same Chunky slippers that I'd made for my Mum and Father-in-law, and then sew some sort of fabric or other material to the bottoms to reinforce the soles.

I made tracings of my Dad's feet, and got to work on the slippers. I adjusted the pattern from the largest size I'd made so far (Women's size 9), and luckily my Dad was around while I worked on it, so I could get him to try them on as I worked. After a couple of adjustments, I got the sizing right for the basic slipper. These slippers stretch out quite a bit as your wear them, so I couldn't attach the soles right away, since the slippers weren't the right shape yet. I had him wear them for a few hours to stretch them out, and then I was ready to reinforce the soles.

I was originally going to try some faux suede fabric, but I was concerned that this material wouldn't be flexible/stretchy enough to be comfortable. Then someone at my Saturday stitching group mentioned that she had successfully used this rubberized material (the stuff that you can use under carpets, or to line drawers, or to help open jars) for this same purpose. This sounded like a better solution, so I tracked some down - I found it at a dollar store, though I'm sure lots of other places would have it too.

Then, I used the same tracings to cut out some of the material, cutting it a bit larger than the tracings to allow a bit of flexibility when attaching it, and make it less likely that he'd feel the edge of the soles as he wore the slippers.


With a bit of stretching and fiddling, I got the soles pinned in place, and then stitched them on by hand. I also did some stitching across the middle of the soles so they would stay in place on the bottom of the slipper, rather than getting folded or pinched on the bottom.


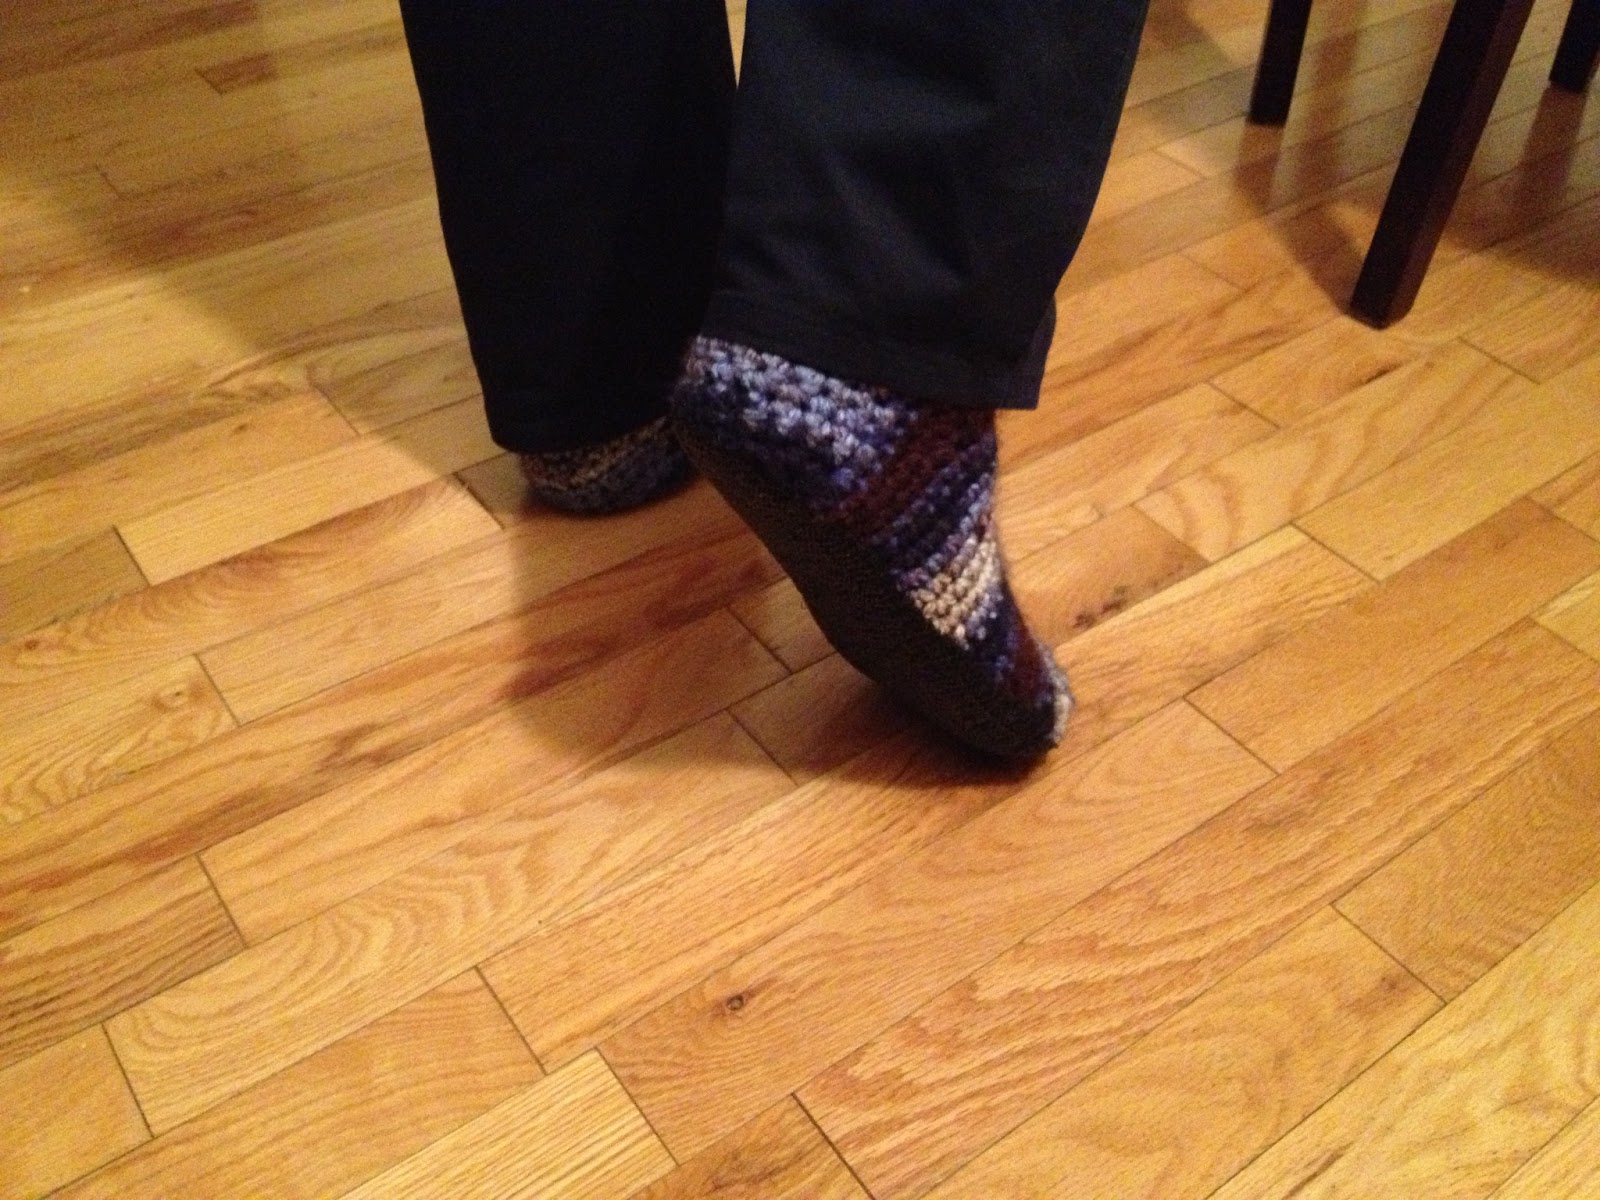
Here my dad is modelling his new slippers with their reinforced soles. Looking good!


And here is a shot of my parents and I all wearing our matching finished slippers. Look at all those cozy toes!


After making these slippers for my Dad, I think I may need to add some of that reinforcing material to my slippers, as I'm starting to wear through them too. In fact, it might need to become a regular part of the pattern.

Edit: These slippers (with the non-slip soles) are now available in my etsy shop

Ok, that's it for slippers – more types of xmas gifts are to come in two more posts.

Keep crafting!

Friday 4 January 2013

Finding the Perfect Slipper-Boot Pattern


What is a more obvious practical item to crochet or knit when the weather gets cold than slippers? Okay, okay maybe a scarf is more obvious – and to tell you the truth, the first year or so that I crocheted I made almost exclusively scarves (and simple blanket squares)... but when you're sitting there crocheting and your toes get cold, it's not a big leap to think "Hmm... I could make myself some slippers!"

Last year my mother-in-law knit me some lovely thick & warm slipper-booties for xmas, and it was a perfect present! Their house is quite chilly, so it is now almost a ritual that I put on those slippers as soon as I walk in the door to their house and leave them on until bedtime – in fact I keep them at their place so I can't forget to bring them when I visit!


Sometime later a friend expressed interest in making some slippers, so I did a quick Google search and found this list of 5 patterns - http://whipup.net/2011/07/14/5-crochet-slippers-to-make/
I particualrly love the mary jane slipper pattern - it's very simple, and works great. Look at this link: http://goodknits.com/blog/mary-jane-slippers/ (Great name for the blog too, huh? "Oh my good knits!" - so clever.) When I first found this pattern one of my friends whom I had recently taught to crochet immediately started making them for herself and for her family members, and they've been a hit!

The first pair that I made for myself were way too big – I kept thinking that I wanted them to be comfy, not pinching my toes, so I made them a little loose... and of course as soon as I wore them for an afternoon, they stretched out so much that they were falling off my feet! So I started over, making them quite a bit tighter, and they worked out much better, and became my everyday slippers.

As much as I liked the look of these slippers, they aren't the most practical for keeping your toes toasty on really cold evenings - what I really wanted was to make myself a crocheted equivalent to the knitted booties that I had left back in Ontario at my in-law's place. It was surprisingly hard to find a crochet pattern for adult-sized booties in a chunky yarn! Finally after lots of searching, I found this cheap pattern for some quick & chunky slipper boots – or as the pattern calls them, "Serenity Forest Slippers" –  http://www.free-crochet.com/detail.html?code=FC01044&cat_id=332

I gave them a try and Hooray! Exactly what I was looking for! Made with bulky weight yarn, these worked up really quickly (I made a pair in an evening). I have a couple of issues with the original pattern though, so I adapted it a fair bit - I will try to get it written up and posted it here soon. Meanwhile, here is the finished product, made with Loops and Threads Charisma yarn, which is a lovely soft and chunky acrylic that comes in a great range of multi-coloured skeins.


These have been a real success – I wear them almost constantly when I'm at home, and I'll even bring them with me to friends' homes when we visit, to keep my toes nice and cozy :)  And as you'll soon see – once I get my Christmas present posts finished – I made a few pairs of these for Christmas presents!


Keep crafting!

Taking care of business

It is amazing sometimes the way things work out. It's a bit hard to believe, but between the time that I completed those Converse booties, informed my friend, and posted them here, but before she completed the sale on my Etsy store, someone beat her to being my first official sale!

I woke up Sunday morning to a request from a potential buyer to waive shipping fees since she also lives in Regina, so I set up a local delivery code that I can provide to local buyers to receive free shipping (why didn't I think of this before?), and before I knew it I had my first sale!

She had requested a smartphone sock, like these ones that I made for my husband's phone (black, for the iPhone 5), and for my phone (purple & blue, for the iPhone 4/4S).


I had made these back in the fall when we first got these new phones, using sock yarn to keep them quite slim, but still providing protection from scratches and small impacts. In fact, I decided to make the one for my phone after I took it into a cave with me at work (I used to lead Outdoor Ed field trips) so that I could check the time, and I dropped it in the cave, slightly damaging the casing. Luckily I had other, unrelated problems with the phone and they replaced it (apparently without noticing the small dent in the phone) – at which point I decided a case was required to prevent a repeat of the same mishap!


Back to the current item:
On my store I had posted images of all the socks yarns that are easily available to me, and customers are asked to select from this image. She selected colour 2 from the variegated yarn options you can see below.


With these variegated sock yarns it's always a bit of a mystery what the pattern will look like in the end. I kept my fingers crossed that my buyer had noticed that there was a significant amount of yellow in the yarn, and wouldn't be surprised or disappointed about it!

I worked on this case in the drive back to Regina from my parents' place in Calgary, on Tuesday (yes we travelled on New Year's day), and put the finishing touches on it yesterday.

Here it is, the finished custom-made phone sock.


Then I had to figure out how I would package my finished items so that they looked nice when they arrived. I decided to wrap them in tissue paper, to keep them neat and tidy and somewhat protected inside the shipping envelope (in most cases, though obviously this one isn't being shipped so it was delivered just in the tissue paper). Here it is all ready for delivery:


As you can see, I also made myself some basic business cards to include with each order - including a little word cloud (www.wordle.net) I created about my store. I will probably order some professionally made cards eventually, but I think these will do nicely for now! Here's a close up:


Since this was a local delivery item, I dropped it off at her house (she was at work at the time) and she got it last night. She sent me this comment, which made me quite happy about my first sale:

"Got it! Thank you very much! It looks great, and fits my phone snugly. Very impressed! I could see myself bugging you for another in the future"


I guess with this sale I'm officially in business!

Keep crafting!


PS: You can find this item on my Etsy store here